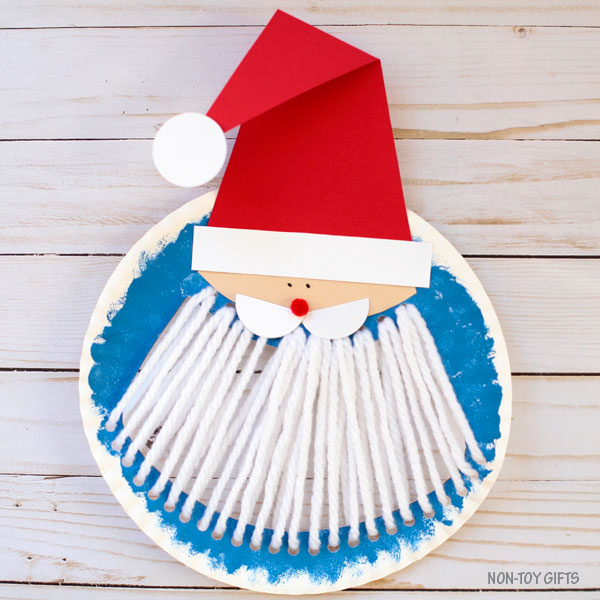
Time for another cute Santa – let’s make a paper plate and yarn Santa craft ! Great Christmas sewing project for kids and a fun craft to display in the classroom or at home.


We have already created a Santa beard craft but we’re using a different technique today. The beard will go inside the paper plate this time.
You can apply to same idea to create a paper plate Christmas tree or a paper plate Grinch heart craft.

Crafting with paper plates is so much fun and when you add yarn to those crafts, it makes it even more interesting.
Besides, it helps kids practice their fine motor skills and prepares them for sewing activities.
Preschoolers may not have the necessary patience for the yarn beard part but this craft is perfect for kindergartners and older kids. For younger kiddos you can skip the yarn and make instead Santa’s beard from cardstock paper. In this case all they will have to do is paint, cut and glue – all fun and easy steps.
This adorable paper plate and yarn Santa craft will look great hung as an decoration by the fireplace or in the kids’ bedroom.

This post contains affiliate links. I may receive commissions for purchases made through links in this post at no cost to you.
If you are a teacher and decide to make Santa in the classroom with your students, make sure to use our Santa craft template.
RELATED: Check out our collection of Santa crafts or this list of lovely 40 Santa craft ideas for kids.
Santa craft

Supplies:
- Santa beard template
- paper plate
- blue paint
- round paint sponge
- scissors
- hole punch
- white yarn
- plastic yarn needle
- cardstock paper: ivory, red and white
- red pom pom
- glue
- black marker
How to make a paper plate and yarn Santa craft
Step 1: Start by painting the paper plate blue.
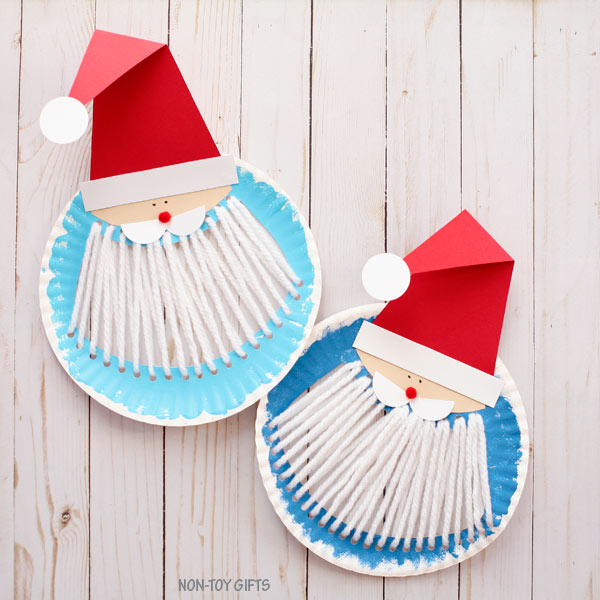
Feel free to use any other color, like green or yellow or your child’s favorite color. After all Santa looks great against any color background.
We used a round paint sponge to paint the plate but a paint brush or a regular paint sponge will work well, too.
We prefer paint sponges when painting paper plates, it’s faster and definitely more fun for kids.
Step 2: While waiting for the paint to dry completely, download the Santa beard template and cut the parts from cardstock paper (all except for the beard).
It is written next to each part what color the cardstock paper has to be.


Step 3: Use the beard shape to trace Santa’s beard on the paper plate and cut it out.
Punch holes along the top and bottom lines.
Cut a big strand of yarn, thread it through the plastic yarn needle and tie one end to the needle. Secure the other end of the yarn at the back of the paper plate with tape.
You can now start threading the white yarn through the holes in the paper plate. Continue until you reach the end of your yarn.
If you haven’t threaded through all the holes, you can cut another strand of yarn and follow the same steps as before. (Tie one end to the needle and secure the other hand to the paper plate).


Step 4: Assemble Santa by gluing the face, mustache and hat with brim and pom pom.
Glue a little red pom pom on top of the mustache and use a black marker to draw 2 small eyes.


Paper Plate Santa Craft
A fun paper plate Santa craft to help kids work on their fine motor skills.
Materials
- Santa beard template
- paper plate
- blue paint
- round paint sponge
- white yarn
- cardstock paper: ivory, red and white
- red pom pom
- glue
- black marker
Tools
- scissors
- hole punch
- plastic yarn needle
Instructions
1. Start by painting the paper plate blue. Feel free to use any other color, like green or yellow or your child’s favorite color. After all Santa looks great against any color background.
We used a round paint sponge to paint the plate but a paint brush or a regular paint sponge will work well, too. We prefer paint sponges when painting paper plates, it’s faster and definitely more fun for kids.
2. While waiting for the paint to dry completely, download the Santa beard template and cut the parts from cardstock paper (all except for the beard). It is written next to each part what color the cardstock paper has to be.
3. Use the beard shape to trace Santa’s beard on the paper plate and cut it out. Punch holes along the top and bottom lines. Cut a big strand of yarn, thread it through the plastic yarn needle and tie one end to the needle. Secure the other end of the yarn at the back of the paper plate with tape. You can now start threading the white yarn through the holes in the paper plate. Continue until you reach the end of your yarn.
If you haven’t threaded through all the holes, you can cut another strand of yarn and follow the same steps as before. (Tie one end to the needle and secure the other hand to the paper plate).
4. Assemble Santa by gluing the face, mustache and hat with brim and pom pom.
Glue a little red pom pom on top of the mustache and use a black marker to draw 2 small eyes.