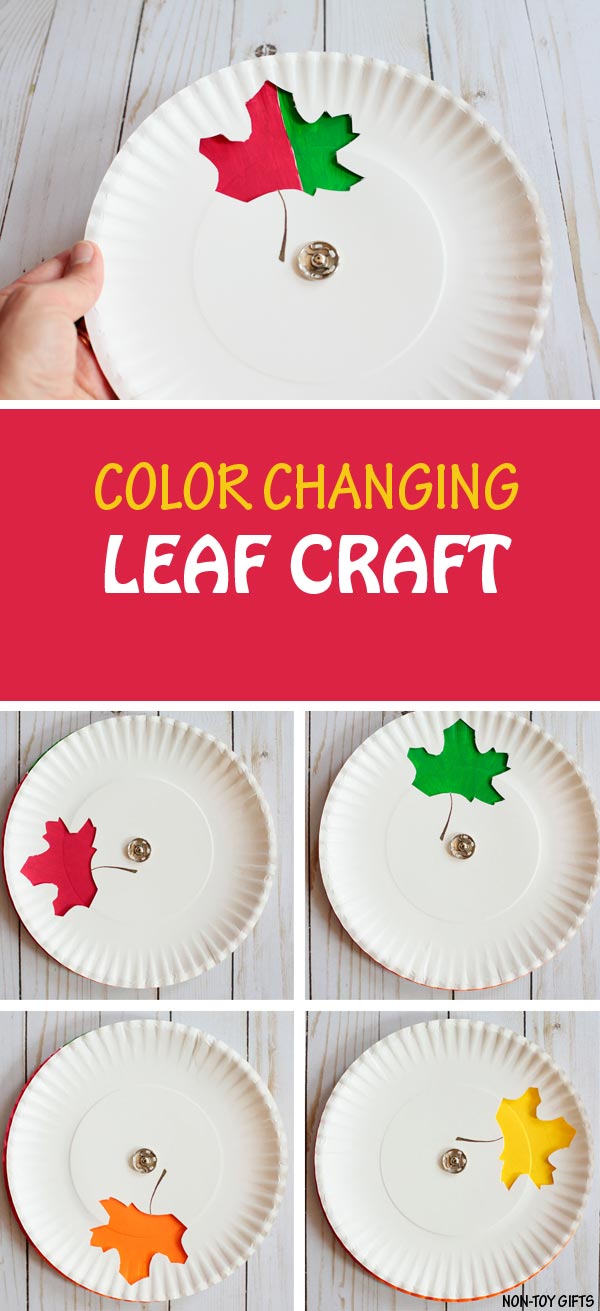
Use a paper plate and paint to make a beautiful color changing leaf craft for kids this fall.
We don’t have to go far to admire the beautiful fall colors. There is a small park right behind our house with plenty of trees. It’s like we have our own private color changing show. We absolutely love it.
Because it’s been pretty chilly the last couple of days, some of the branches have already started to turn red.

This inspired me to create a fun color changing leaf craft that my kids can play with.
It’s a simple paper plate craft.
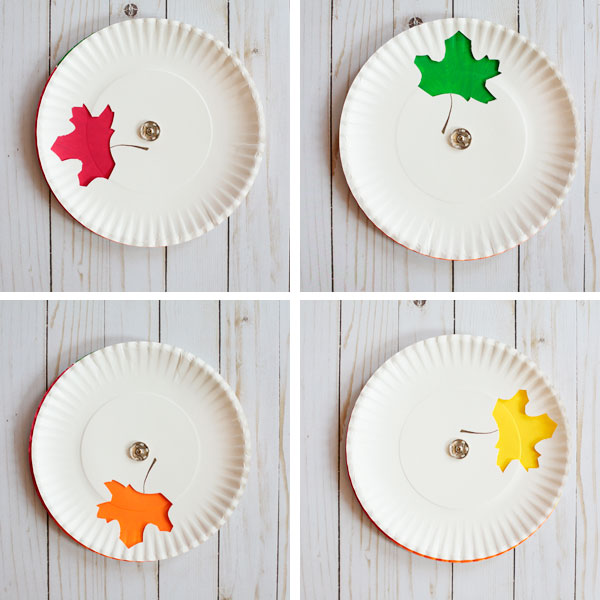
Kids can change the color of the leaf by spinning the paper plates around.
Make it at home or in the classroom with preschoolers, kindergartners and older kids. Depending how complex the leaf is, an adult may have to do the cutting. If the leaf is simple, kids can use scissors to cut it out. Our maple leaf had a lot of details and I used a craft knife myself.
More fall crafts for kids:
Color changing leaf craft

This post contains affiliate links. I may receive commissions for purchases made through links in this post at no cost to you.
Supplies:
- paper plates
- acrylic paint: green, yellow, orange and red
- paint brush
- craft knife
- pen
- brown marker
- brass fastener
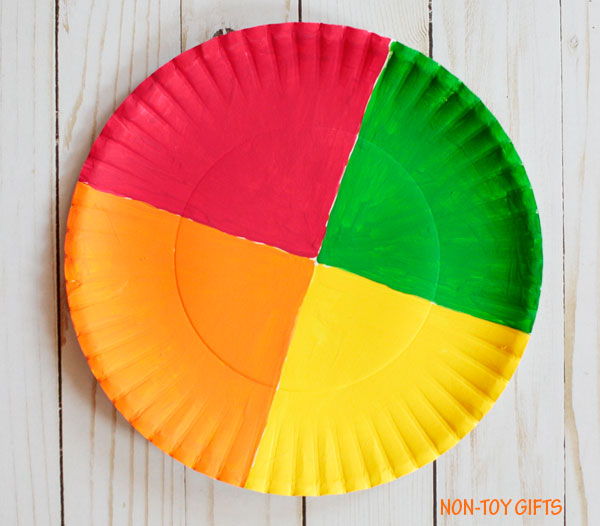
Step 1: Use a pen to divide a paper plate into 4 equal parts.
Paint each part into a different color. Start with green and then use yellow, orange and red.
You may want to wait for each part to dry before moving on to the next one just because kids can get frustrated sometimes if they don’t manage to keep a straight line where the two colors come together and they may end up mixing the colors.

Step 2: Draw a leaf on the other paper plate. Use a craft knife to cut it out. (adult only). Draw the leaf stem with a brown marker.


Step 3: Place the paper plate with a leaf on top of the colored paper plate. Use a pen to poke a small hole in the middle.
Step 4: Use a brass fastener to attached the two paper plates together. If you don’t have any brass fastener don’t worry. We didn’t have one either. A sew-on snap will work just fine.
Have fun turning the plate to make the leaf change its color.


Paper Plate Leaf Craft
A beautiful paper plate leaf that changes color when kids spin it.
Materials
- paper plates
- acrylic paint: green, yellow, orange and red
- brown marker
Tools
- paint brush
- craft knife
- pen
- brass fastener
Instructions
1. Use a pen to divide a paper plate into 4 equal parts. Paint each part into a different color. Start with green and then use yellow, orange and red. You may want to wait for each part to dry before moving on to the next one just because kids can get frustrated sometimes if they don’t manage to keep a straight line where the two colors come together and they may end up mixing the colors.
2. Draw a leaf on the other paper plate. Use a craft knife to cut it out. (adult only). Draw the leaf stem with a brown marker.
3. Place the paper plate with a leaf on top of the colored paper plate. Use a pen to poke a small hole in the middle.
4. Use a brass fastener to attached the two paper plates together. If you don’t have any brass fastener don’t worry. We didn’t have one either. A sew-on snap will work just fine.
Check out more easy crafts for kids!